

FAB-FORM MONOPOUR
SITE INSTALLATION
Tools
- Variable speed clutched cordless drill with a 6mm hex driver, 90 degree drive, hex bit for wood screws
- Foam gun
- Laser or builders level
- 2' level
- String lines
- Hammer for driving stakes
- Utility knife
- Tape measures: 25', 100'
Materials
- 1x4s, stakes for batter boards, strongbacks
- 36" zip ties for clamping components together
- Low expansion EPS foam glue
- Zont™ & Zuckles for bracing
- Flat head wood screws: #8 1-1/2", 2", 3"
Site Preparation
- Excavate to required depth and 2' outside of building perimeter
- Install 4" drainage layer (to ensure all water in the excavation can exit to drainage system)
- Set up batter boards & string lines on three sides of foundation
- Located stringlines exactly 1" from the face of ICF block and 3" higher than top of footing
- Set up builder's level or laser in the center of excavation
- Check that drain rock is level to an accuracy of + or - 2"
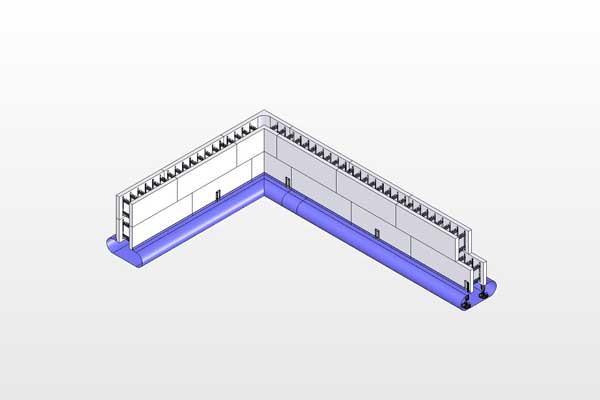
Install First Level Components
- Adjust laser sensor to read to the top of the footing height plus two ICF blocks
Begin with Corner Component
- Bring each face 1" from string line using a 1x4 spacer
- Do a rough height adjustment using two people: one on inside, one on outside . Place sensor on top of component directly above the side support, and adjust height to an accuracy of 1/4"
- Ensure fabric center line is directly under the center of wall
- IMPORTANT: ensure ground under the pads is solid so there is NO settlement. A 4" to 6" granular layer is ideal.
Install First Level Components Clockwise Around Perimeter
- Back off middle pair of supports on a straight component so they don't touch ground
- Place component in position and do a rough leveling on end supports
- Dry check to ensure the components fit together
- Run two beads of foam glue along supporting vertical and horizontal edges
- Press glued joint together and level up side supports at end of component
- Use 36" zip ties to hold joint together as required
- Check to ensure centerline of Fastfoot® is centered under wall
- Button up Fastfoot® overlaps with 1" washers and 1-1/2" x #8 coarse wood screws
- Once lower level components have been installed around perimeter, install second level components
Install Second Level Components Clockwise Around Perimeter
 Zont™ bracing is fast and cost effective.
 Corner and straight sections are leveled up 1" from string lines.
 Two component levels are installed.
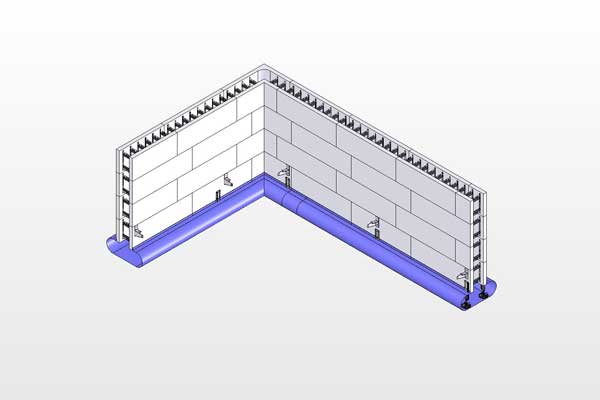 Lower Zonts™ are screw attached at the top of the first block, 6' on center.
 Mid level Zonts™ are attached on the fourth level of block, directly above the lower Zont™.
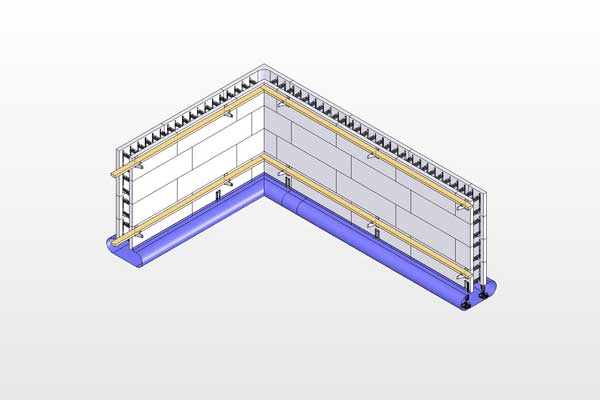 2x4 walers are placed in Zont™ saddles.
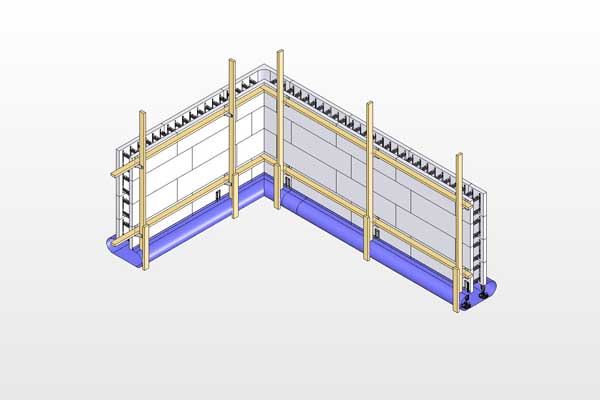 Strongbacks are inserted between waler and CamLock.
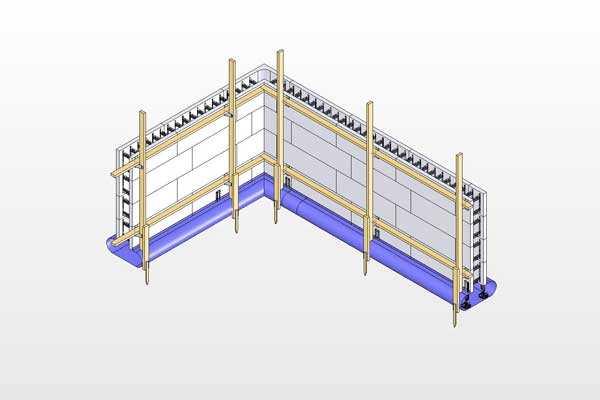 Check the location of the wall against the string line, stake the strongback in position.
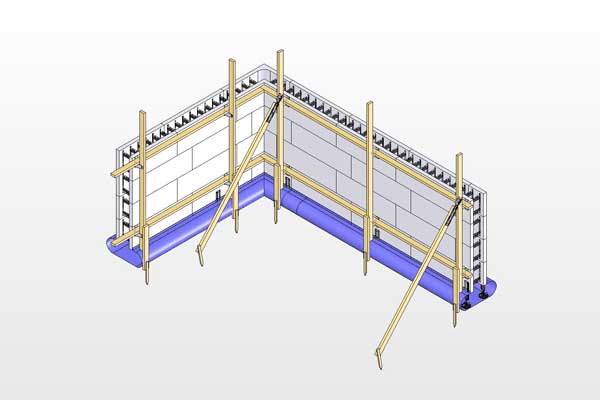 Install kickers to each strongback. Stake base solidly to ground and plumb strongback.
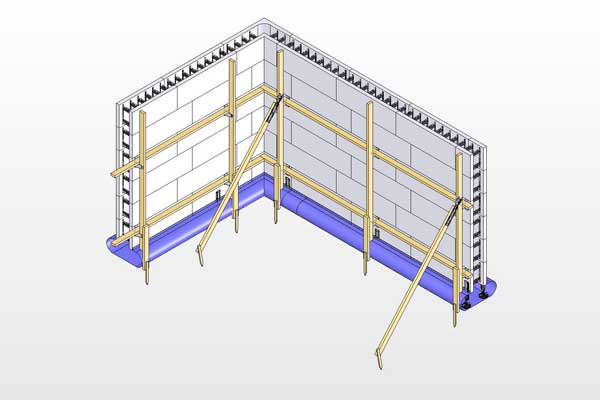 Build the balance of the ICF wall.
 Screw attach the top Zonts™, place top walers in place.
Install Zont™ Bracing
- IMPORTANT: never leave a wall unbraced - a gust of wind can blow it over
- Screw attach lower level Zonts™ 6' on center so the 2x4 waler is positioned above side support
- Use two 1-1/2" #8 flathead wood screws for attachment
- At the top of the second component, screw attach a second level of Zonts™ directly above the first level Zonts™
- Place 2x4 walers into Zont™ saddles
- For waler joint continuity, scab a 4' 2x4 on top
- In corners, screw 2x4s together to prevent waler movement
- Place 2x4 vertical strongbacks between the waler and CamLock 6' on centre
- Use a minimum of three #8 - 2" screws to attach 3/4" plywood gussets to strongback at about 5' above ground (always ensure your catwalk conforms to local regulations - in most jurisdictions a catwalk height greater than 6' will require a railing)
- Screw attach Zuckle™ to end of each 2x4 kicker.
- Using Zuckle™ driver, adjust length to be at the mid-point of the adjustment range
- Screw attach Zuckle™ end to strongback just above catwalk
- Drive two stakes near the lower end of each kicker (do not screw attach at this stage)
Accurately Align Lower Wall
X-Y Alignment
- Ensure wall is roughly plumb (adjust side supports if necessary)
- Move wall until base is located exactly 1" away from the string line
- Drive stake at base of strongback and screw stake to strongback to lock base of wall in position 1" from string line
- Adjust Zuckle™ to ensure strongback is plumb
Vertical Alignment
- Using laser sensor, adjust wall height to exact height
- Remember it is easy to raise wall but difficult to lower
- Once height is accurate to 1/8", turn Camlocks counter clockwise to lock walers and strongbacks against ICF wall.
Build Top Half of Wall
- Install catwalk
- Use either plywood gussets (see above) or install a second vertical 2x4 2' outside each strongback with a 2x6 cross member to support the 2x10 catwalk
- Always ensure catwalk meets local codes
- NEVER place scaffolding loads on ICF wall or walers - ALWAYS use strongbacks to support scaffolding
- At top of the wall, screw third set of Zonts™ to the ICF and strongback (use extension on drill to screw Zont™ behind strongback)
- Place 2x4 waler in upper Zont™ saddles and lock in place with the CamLock
- Attach 1x4 blocks on each corner and run string line between
- Adjust Zuckles™ so that wall face is exactly 3/4" from string line
Pre-Pour Checklist
Monopour
- All debris in footing bag removed?
- Footing steel properly installed?
- All Fastfoot® edges folded over and screwed (with washers) to base of ICF block through every web?
- Have the top of wall elevations been checked for accuracy?
ICF
- Top block foamed in place to prevent lifting?
- No vertical edges unsupported by more than a half web distance?
- Vertical joints within one web of each other supported by strapping or glue?
- Alignment string in place around the top outside of entire wall spaced out 3/4" to check horizontal alignment?
- All horizontal and vertical rebar in place?
- Reinforcing in place for external retaining walls?
- Holes and damages repaired with foam or strapping?
Window & Door Bucks
- Bucks located within 4' of corner supported to corner?
- Bucks located within 18" of corner supported internally with coil rod?
- Internal bracing (vertical and horizontal) on bucks?
- Buck edges attached to both sides of wall?
- Buck anchors (6" screws or spikes) angled 16" on center to hold buck to concrete?
- Openings between buck and ICF foamed?
Zont™ Bracing
- 2x4 waler joints overlapped to provide continuity?
- Corners positioned, plumbed and braced?
- Bottom of wall positioned to lower string line, then afixed with stake to bottom of strongback?
- Screw holding strongback to Zont™ slightly loose to allow for height adjustment?
- Kickers staked firmly to the ground with Zuckles (turnbuckles) for adjustment?
- Scaffolding installed to access top of wall?
Other
- Ordered concrete with 5-1/2" slump for footing?
- Arranged for morning delivery?
- Placing equipment on site: 1" vibrator, trowels, anchor bolts?
- Pump includes 3-1/2" line reducer?
- Adequate labor for concrete placement (one on line, one on vibrator, two finishing, etc.)?
- Stakes, sledge hammer, dimensional lumber for footing blowout protection?
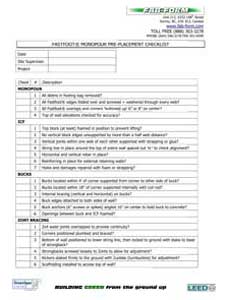
Click on image to right for a printable PDF of checklist
Concrete Placement
- IMPORTANT: Use a 5" to 6" slump for the footing and first block to ensure concrete flows freely into Fastfoot® (a poorly filled footing will lead to alignment problems and possible form failure as the concrete builds up on the plastic webs and steel reinforcing)
- Begin placement under openings and bottom of stepped footings to allow these areas to go 'off' first
- Always fill lower areas first, as concrete sliding down bank can pull fabric and lead to fabric failure at attachment points
- Use a pencil vibrator to consolidate footing, but do not over vibrate as this will force any concrete in wall to 'blow-up" the footing bag
- Fill footing in direction of fabric overlap (counter clockwise) to prevent concrete leaking between overlap
- IMPORTANT: Allow sufficient time for the footing concrete to go 'off' so subsequent lifts do not increase hydraulic load in footing
- Kick the bag, or 'sound the concrete' to confirm stiffness
- Never use a retarder in the footing concrete
- In winter, use a 2-1/2" slump mix and add a plasticizer to achieve flow, continue filling wall when the slump has returned to 2-1/2"
- Check wall alignment using string lines during and after pour
